Butterfly Braid Ponytail: 18 Beautiful Ideas and an Easy Step-by-Step Tutorial

A butterfly braid ponytail is a ponytail with one important twist: the braid itself is gently pulled open, loop by loop, until it opens into soft, wing-like sections. It looks full, romantic and far more complicated than it is, and it works in two very different ways. There is a quick version you can do on your own hair in about 15 minutes with no extensions at all, and there is a protective feed-in version, often done with braiding hair, that can stay in for over a week. This guide covers both honestly, shows you 18 ways to wear the style, and tells you exactly how tight is too tight, so your edges stay safe while you wear it.
Quick answer: what is a butterfly braid ponytail?
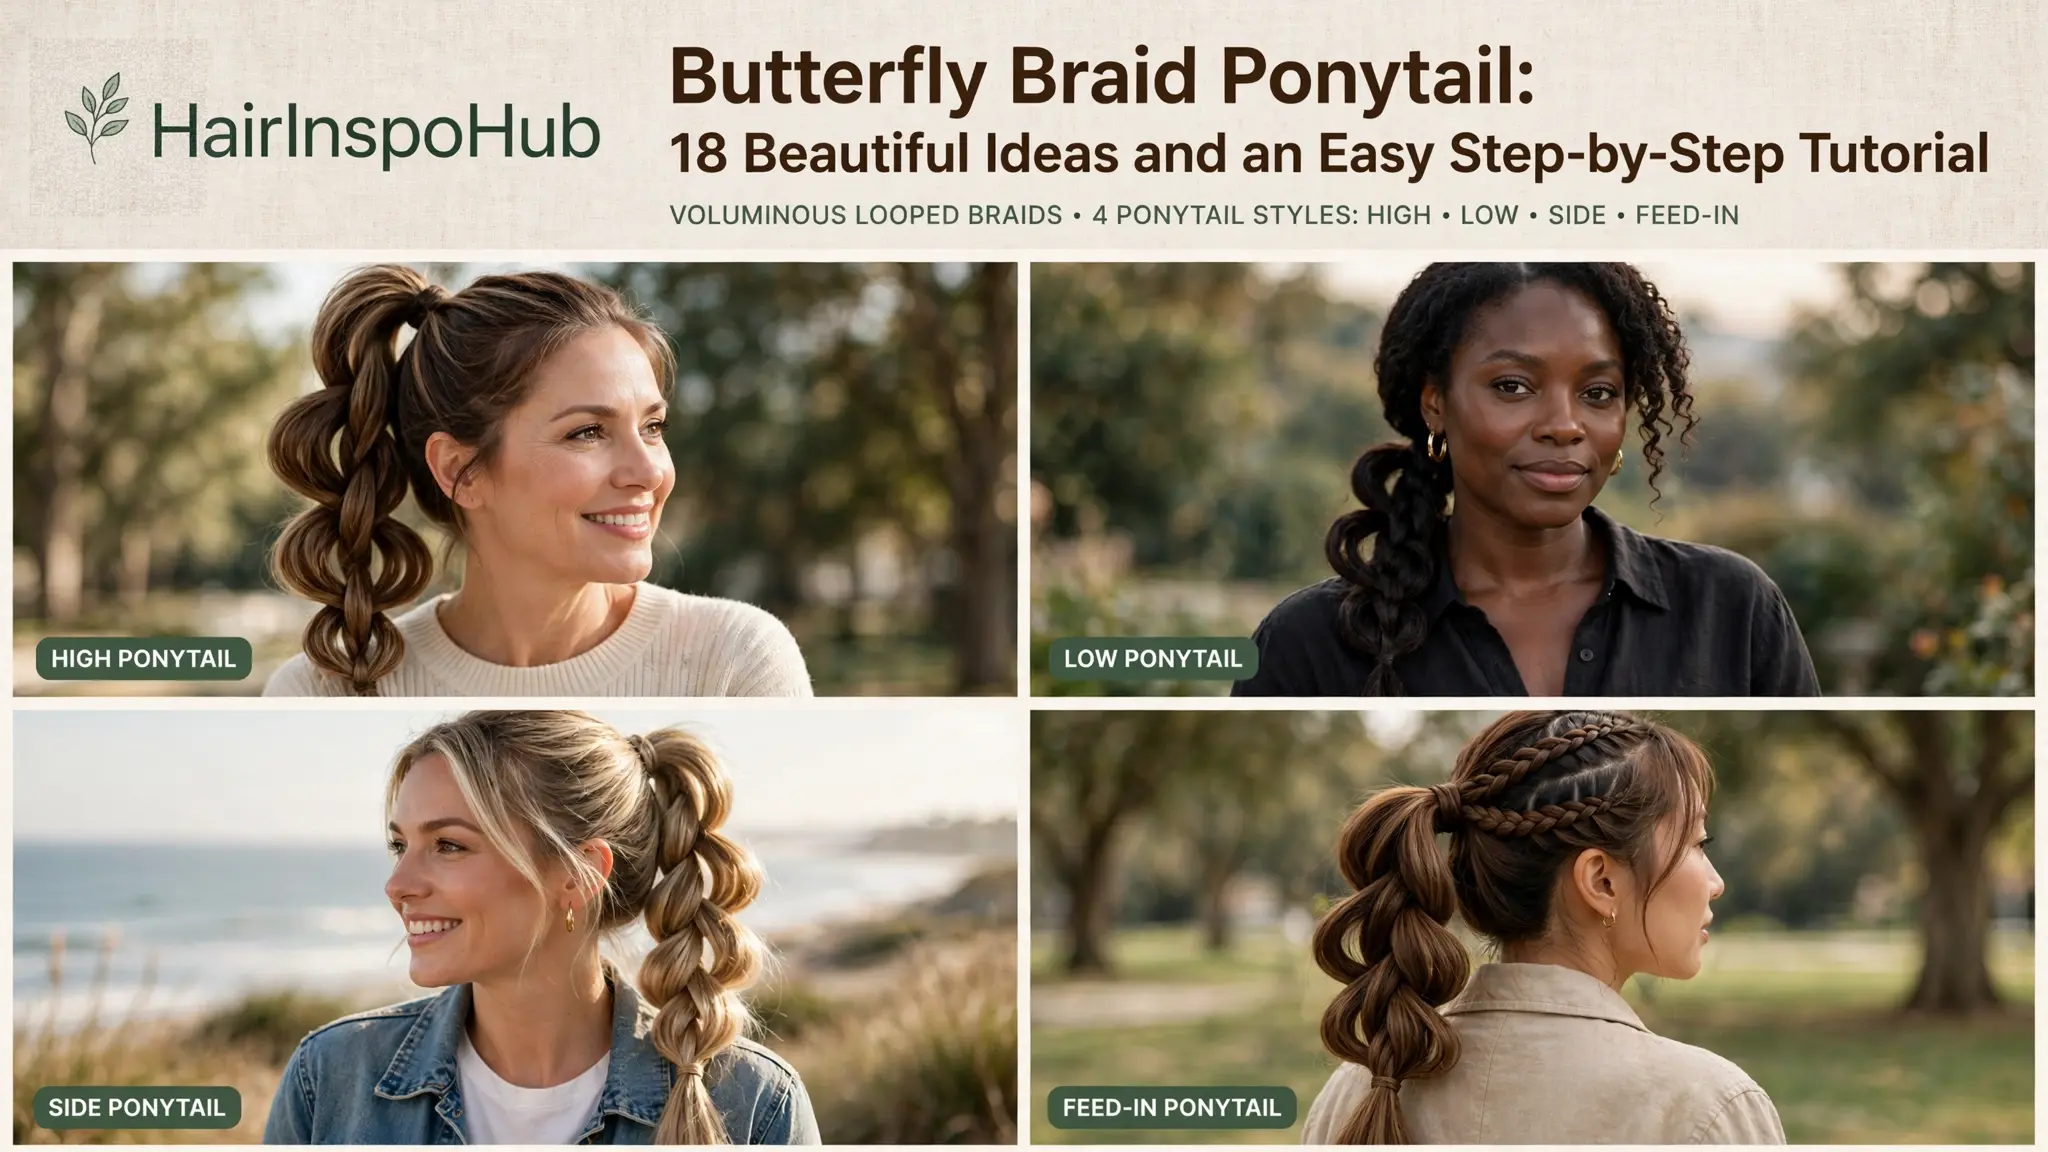
A butterfly braid ponytail is a high, low or side ponytail in which the braid is loosened (“pancaked”) on both sides so each section fans out like a butterfly wing. The base ponytail gives the lift and security; the opened braid gives the volume and the soft, fluttery shape. On natural and textured hair it is often created as a feed-in butterfly braid gathered into a ponytail, which also makes it a protective style. On straight, wavy or fine hair it is usually a regular three-strand or fishtail braid in a ponytail that is pulled wide for the same effect.
- Time needed: 10 to 20 minutes for the quick version; 1.5 to 3 hours for a feed-in protective version with extensions.
- Difficulty: Easy to medium. If you can make a normal braid and a ponytail, you can make the quick version today.
- Best hair length: Medium to long. Short hair can do the mini version in idea 14, or add a ponytail extension.
- How long it lasts: One day for the quick version; up to 1 to 2 weeks for a well-kept feed-in protective version.
- Extensions: Optional. They add length and fullness, they are never required for the butterfly shape itself.
Butterfly braid ponytail at a glance
| Style detail | Quick version | Feed-in protective version |
| Extensions | None needed | Braiding hair usually added |
| Time | 10-20 minutes | 1.5-3 hours |
| Lasts | 1 day | 7-14 days with care |
| Tension level | Low if base is comfortable | Low-medium; must never hurt |
| Best for | Events, photos, weekends | Protective styling, holidays |
| Take-down time | 2 minutes | 20-40 minutes, gently |
Butterfly braid vs bubble braid vs pull-through braid: what is the difference?
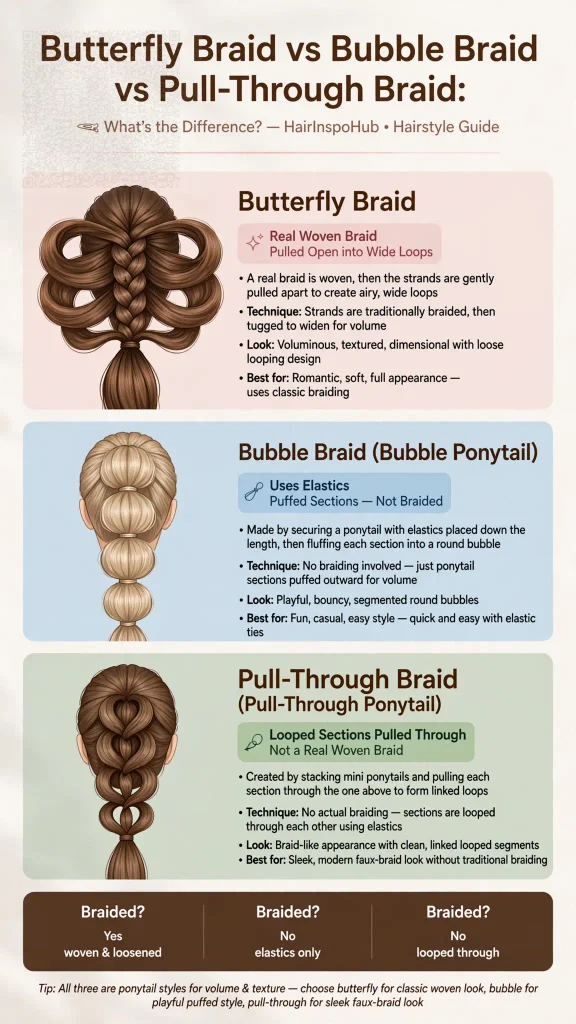
These three styles are mixed up constantly in search results, and the mix-up is why many tutorials confuse beginners. They are not the same thing, and the difference decides which one your hair can actually do.
| Style | How it is made | Is it a real braid? | Best for |
| Butterfly braid ponytail | Braid, then pull loops wide | Yes | Full, soft, romantic volume |
| Bubble ponytail | Elastics down the ponytail, hair puffed between them | No | Fast, playful, no braiding skill |
| Pull-through ponytail | Loops of hair pulled through each other in a row | No | Thick-looking braid effect on fine hair |
| Classic butterfly braids | Two large feed-in braids left loose, loops pulled out | Yes | Protective style worn down |
In short: if there is no woven braid in it, it is not a butterfly braid, however pretty it looks. A bubble ponytail is a lovely backup on a day when braiding will not cooperate, but the butterfly shape specifically comes from opening a real braid.
What you need before you start
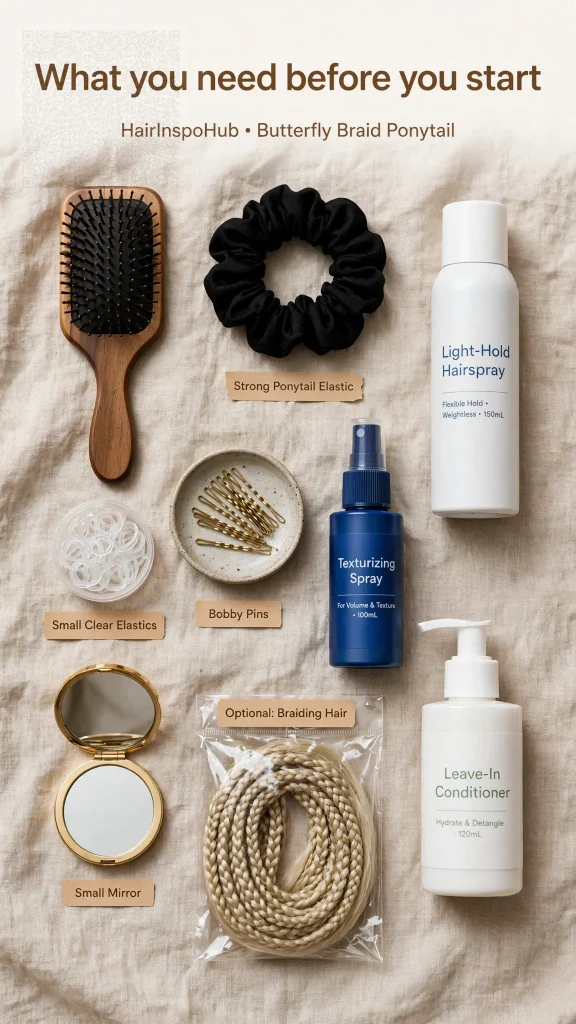
- For every hair type: a brush, a strong ponytail elastic plus small clear elastics, bobby pins, light-hold hairspray or setting mousse, and a small mirror to check the back.
- For straight or wavy hair: a texturizing spray or dry shampoo on day-two hair. Slightly gritty hair grips far better than freshly washed, slippery hair, and the loops stay open longer.
- For curly or coily hair: a leave-in conditioner, a light oil or cream for moisture, edge control only if you like a sleek base, and braiding hair if you are doing the feed-in version.
- Optional extras: a ponytail extension or weave bundles for length, ribbon or cord for weaving through the braid, and small butterfly clips if you want the literal butterfly finish.
How to prep your hair so the braid actually holds
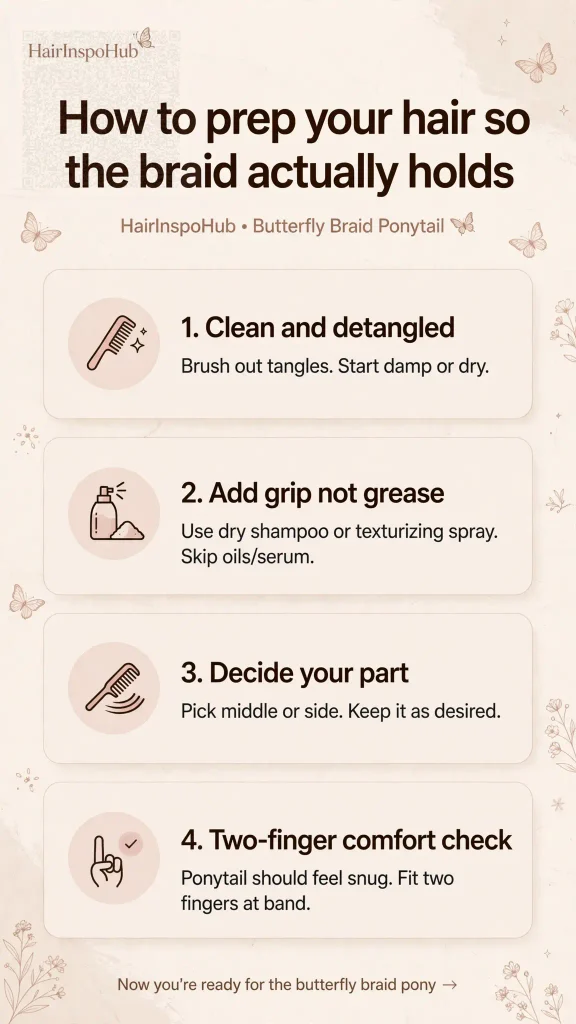
Most butterfly braid ponytails fail before the braid even starts, because the hair was too clean, too wet or too tight at the base. Prep takes three minutes and decides everything.
- Start clean and fully detangled. For the protective version, hair should also be well moisturised, because it may stay tucked away for days.
- Add grip, not grease. Work a pea-sized amount of mousse or texturizing spray through the lengths. Heavy oils make loops slide closed again.
- Decide your part first. Middle, side or no part at all changes the whole look. Comb it in before the ponytail goes up, not after.
- Check the base tension with two fingers. You should be able to slide two fingers under the elastic and blink comfortably. Pain, pulling at the temples or a headache means it is too tight: redo it looser. That rule matters most for the protective version, which stays in for days.
How to do a butterfly braid ponytail: step by step
Method 1: the quick butterfly braid ponytail (no extensions)
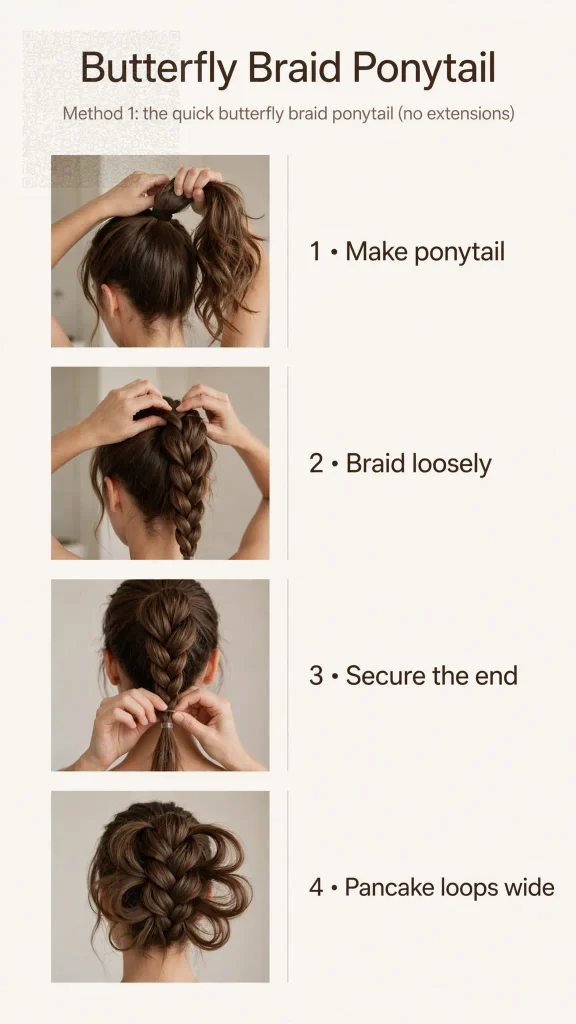
- Make your ponytail. Brush hair into a high, mid or low ponytail and secure it firmly but comfortably. Wrap a small strand of hair around the elastic and pin it underneath for a clean finish.
- Braid the ponytail loosely. Make a normal three-strand braid (or a fishtail for a finer pattern) and leave the last 5 to 7 cm unbraided. Loose now means easy to open later; a tight braid will not pancake.
- Secure the end with a small clear elastic. Leave the tail soft rather than braiding to the very tip.
- Pancake one side at a time. Starting at the top, gently pull the outer edge of each braid section outward with your fingertips. Work down one side, then repeat on the other side so the wings stay even.
- Pull in small amounts. Open each loop a little, move on, then come back and open it more if needed. Pulling one loop too far, too fast is how braids unravel.
- Shape the wings. Once the braid is wide, fan the top two or three loops slightly more than the rest. That is where the butterfly shape reads most clearly.
- Set and finish. Mist lightly with hairspray, smooth flyaways with a fingertip of mousse, and curl or wave the loose tail if your hair is straight.
Method 2: the feed-in protective butterfly braid ponytail
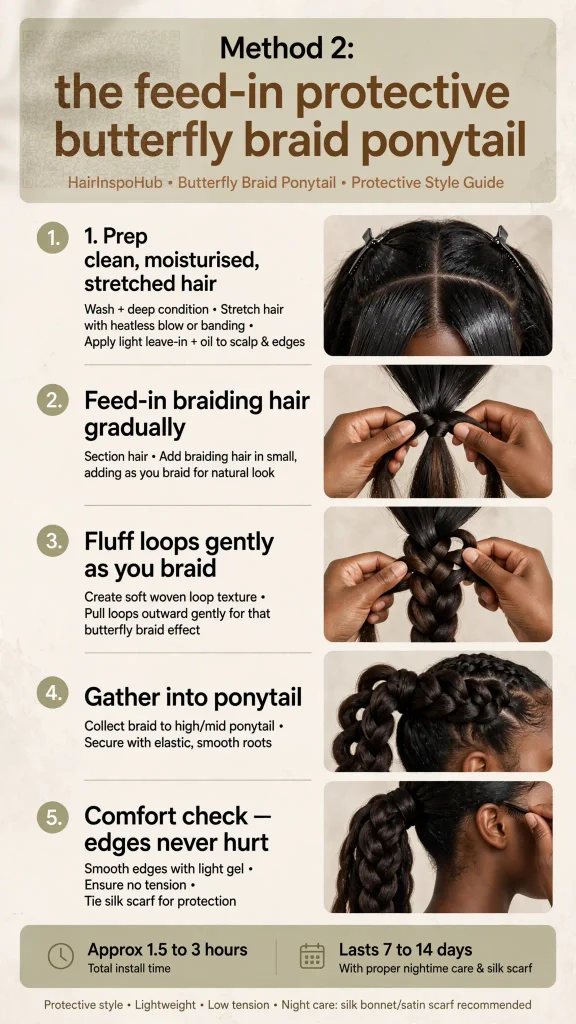
This is the version most often seen on natural hair: one or two feed-in butterfly braids braided from the front and gathered into a ponytail, often with braiding hair added for length and fullness. It is beautiful and genuinely protective, but it is also the version most often done by a braider, and there is no shame in that. A simple, honest breakdown:
- Start on clean, moisturised, stretched hair. Section the front into one or two braid paths, depending on whether you want a single braid or two braids meeting in the ponytail.
- Feed in braiding hair gradually. Small pieces are added as the braid moves back, keeping the start flat and the tension even rather than heavy at the hairline.
- Pull the loops open as you go. Unlike the quick method, the butterfly loops here are usually fluffed during braiding, gently, so no single point takes the strain.
- Gather everything into the ponytail. Secure with a strong elastic, wrap the base, and leave the ends loose, curled, or braided into one butterfly braid down the back.
- Do the comfort check again. A protective style should feel secure, never sore. Soreness, tiny bumps at the hairline or pain when you raise your eyebrows means the braid is too tight and should be loosened or redone. Protective styling only protects when the tension is low.
18 butterfly braid ponytail ideas to try
Every idea below uses one of the two methods above. The differences are placement, parting, finish and what you leave loose, which is good news: learn one braid and you have all eighteen.
1. Classic high butterfly braid ponytail
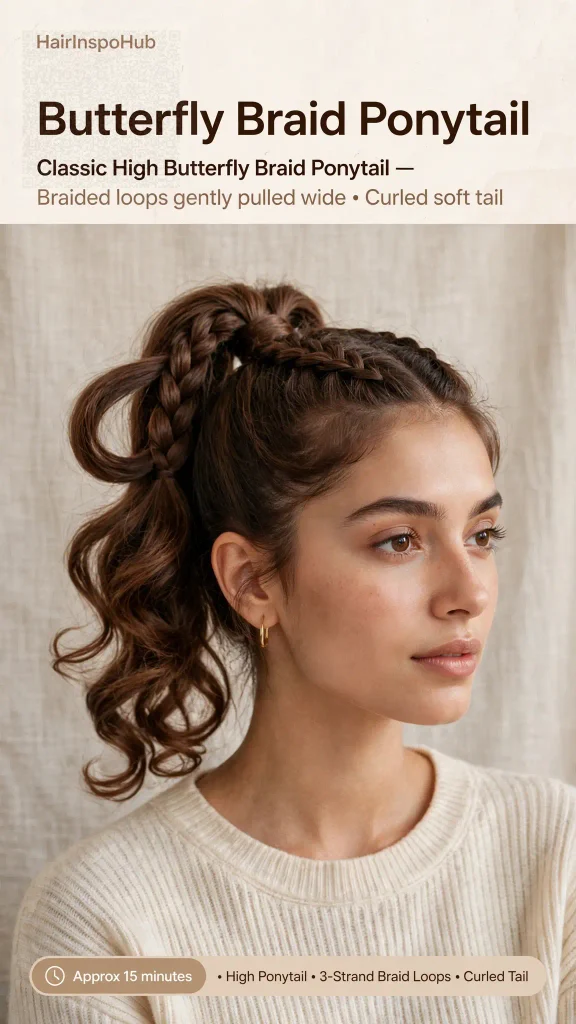
Best for: Almost everyone; the most searched version of this style.
Time: 15 minutes (quick method).
How to get it: High ponytail, three-strand braid, pancake both sides evenly and curl the tail.
Hold tip: Re-fluff the top loops before photos; they settle first.
2. Sleek high butterfly ponytail with a swoop
Best for: Natural and relaxed hair; polished events and nights out.
Time: 20 minutes, or feed-in version by a braider.
How to get it: Smooth the base with gel and a brush, add a side swoop at the front, then butterfly-braid the ponytail.
Hold tip: Tie down with a silk scarf for 10 minutes to set the sleek finish.
3. Two butterfly braids into one ponytail
Best for: Thick hair; anyone who finds one braid looks too thin.
Time: 25 minutes.
How to get it: Part hair down the middle, make two braids, pancake both, then join them into one high ponytail so the wings layer.
Hold tip: Join with a strong elastic, then wrap the base with a strand from each braid.
4. Side-part butterfly braid ponytail
Best for: Softening a strong jawline; date nights and dinners.
Time: 15 minutes.
How to get it: Deep side part, low-to-mid ponytail on the heavier side, loose butterfly braid with a wavy tail.
Hold tip: Keep face-framing pieces out on the part side for softness.
5. Low romantic butterfly braid ponytail
Best for: Weddings, garden parties, soft glam looks.
Time: 15 to 20 minutes.
How to get it: Low ponytail at the nape, very loose braid, loops pulled wide and slightly uneven on purpose, ends curled.
Hold tip: Pin two loops in place at the back if your hair is slippery.
6. Butterfly and bubble braid hybrid ponytail
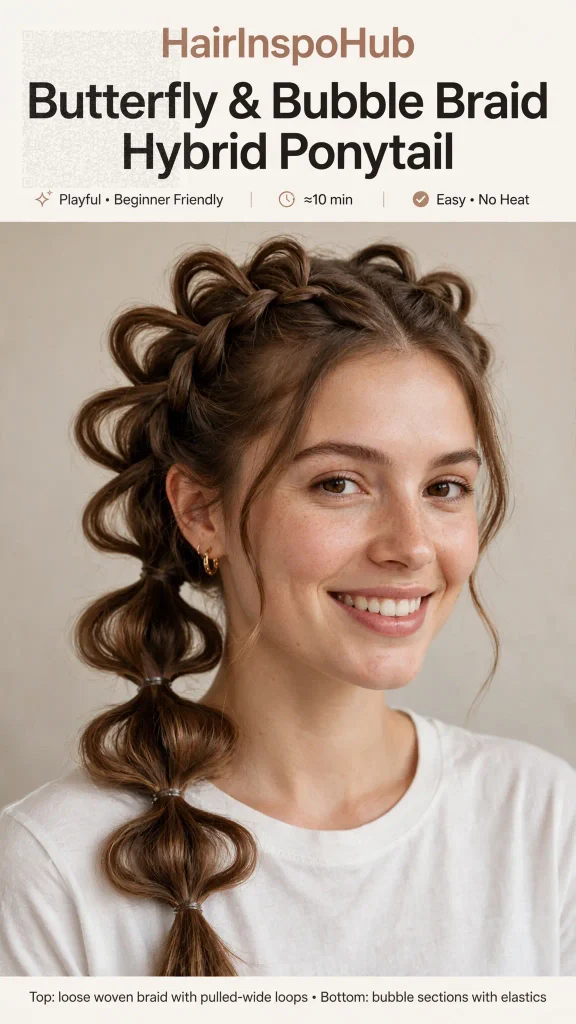
Best for: Beginners; festivals and fun daytime looks.
Time: 10 minutes.
How to get it: Butterfly-braid the top half of the ponytail, then switch to bubble sections with small elastics for the bottom half.
Hold tip: Match elastic colour to your hair so the bubbles look intentional.
7. Boho butterfly braid ponytail with curly leave-out
Best for: Curly and coily hair; bohemian and holiday looks.
Time: 20 minutes, longer for feed-in.
How to get it: Butterfly-braid the ponytail but leave curly pieces falling out of the loops and around the face as you go.
Hold tip: Refresh the loose curls with water and leave-in, not more gel.
8. Half-up butterfly braid ponytail
Best for: Fine or medium hair that feels overwhelmed by a full ponytail.
Time: 10 minutes.
How to get it: Take only the top half of your hair into a small ponytail, braid and pancake it, and leave the rest loose and wavy.
Hold tip: Backcomb the crown lightly before securing, so the small braid has something to sit on.
9. Double butterfly ponytails (pigtails)
Best for: Playful looks, festivals, concerts and themed shoots.
Time: 20 minutes for both sides.
How to get it: Part hair down the middle, make two ponytails, butterfly-braid each one and keep the wings as even as you can.
Hold tip: Step back and check both sides in the mirror; symmetry matters more here than size.
10. Braided-base wrapped butterfly ponytail
Best for: Long hair; a polished finish with zero accessories.
Time: 15 minutes.
How to get it: Before the main braid, take a thin section, braid it separately, then wrap that mini braid around the ponytail base. Butterfly-braid the rest.
Hold tip: Pin the end of the wrap underneath the base, never on top where it shows.
11. Butterfly braid ponytail with ribbon woven through
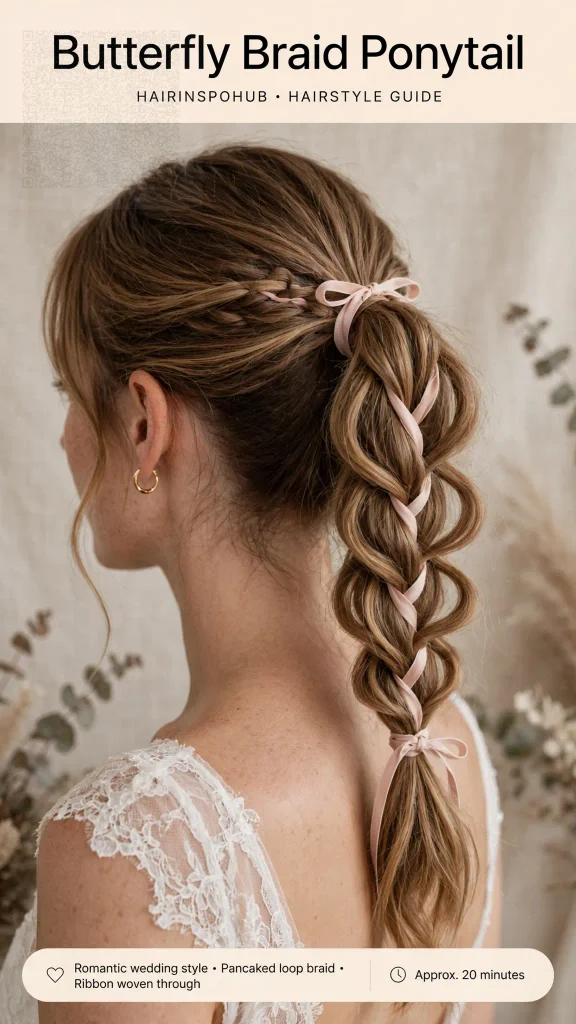
Best for: Weddings, spring and summer events, bridesmaid hair.
Time: 20 minutes.
How to get it: Tie a thin ribbon at the base and weave it through the braid as one of the strands, then pancake gently so the ribbon peeks through the loops.
Hold tip: Pancake slowly; ribbon loops pull out faster than hair loops.
12. Soft wedding butterfly braid ponytail
Best for: Brides and wedding guests with medium to long hair.
Time: 25 minutes.
How to get it: Mid-height ponytail, loose fishtail butterfly braid for a finer pattern, wide soft loops, curled tail, and a few pins or small flowers in the top loops.
Hold tip: Use pins that match your hair colour and set with a flexible-hold spray so it moves in photos.
13. Festival butterfly ponytail with colour pops
Best for: Festivals, parties and content days.
Time: 20 minutes.
How to get it: Add clip-in coloured strands or coloured braiding hair into two or three braid sections before pancaking, so colour flashes inside the wings.
Hold tip: Keep colour in the middle loops, not the top one, for a peekaboo effect.
14. Mini butterfly braid ponytail for shorter hair
Best for: Bob-to-shoulder length hair that cannot do a full braid yet.
Time: 10 minutes.
How to get it: High half ponytail, braid only as far as your length allows (even four or five crossings), then pancake those few loops wide. Add a short ponytail extension if you want length.
Hold tip: Small loops opened wide look fuller than one long tight braid ever will.
15. Butterfly braid ponytail for fine hair (maximum volume)
Best for: Fine or thinning hair that wants the fullest-looking braid possible.
Time: 15 minutes.
How to get it: Use the pull-through trick for the first two sections, then braid and pancake the rest. Tease the ponytail lightly before braiding.
Hold tip: Pancake the sides, never pull loops upward; fine hair tears more easily than it looks.
16. Extra-secure butterfly ponytail for thick, heavy hair
Best for: Thick, long or heavy hair that pulls styles down.
Time: 20 minutes.
How to get it: Split the ponytail into two elastics stacked 2 cm apart for a stronger base, braid in two halves and join the loops visually as you pancake.
Hold tip: If the style gives you a headache within an hour, the base is too high or too tight; drop it 2 cm and redo.
17. Butterfly braid ponytail-to-bun
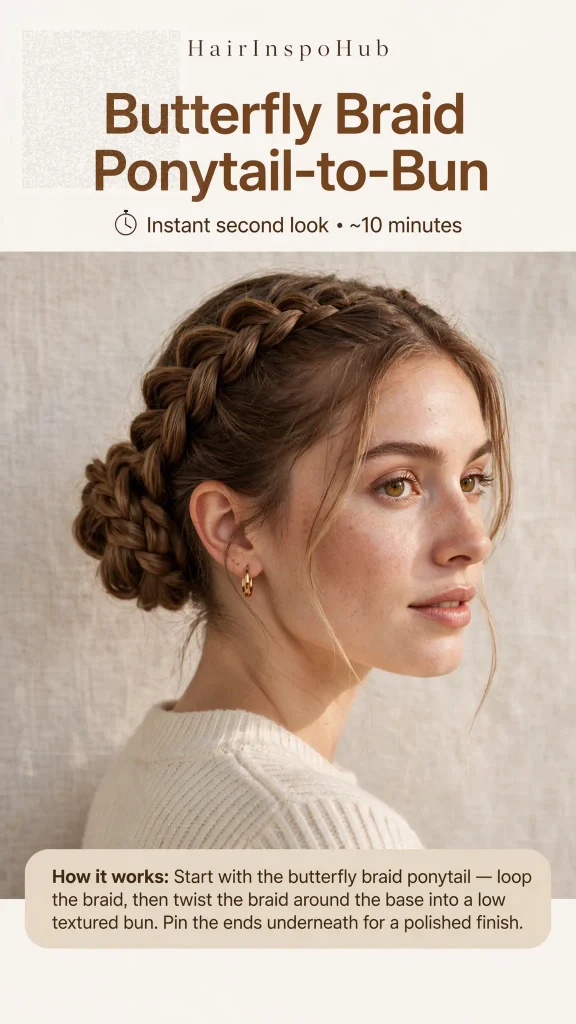
Best for: Hot days, workouts, second-day hair and formal updos.
Time: 10 minutes.
How to get it: Make the butterfly braid ponytail, then twist the braided length into a loose bun and pin, leaving the top loops visible as the detail.
Hold tip: Pin through the loops, not just around them, or the bun will spin loose.
18. Gentle butterfly braid ponytail for kids
Best for: Children with medium to long hair; school photos and parties.
Time: 10 minutes.
How to get it: Low or side ponytail, soft braid, small gentle loops, no tight base and no heavy extensions. Keep it comfortable enough to forget about.
Hold tip: Skip the hairspray; a soft elastic and two pins are enough, and comfort beats hold at this age.
How to choose the right version for your hair
| Your hair | Best version | Why |
| Straight, slippery | Fishtail butterfly, day-two hair | Finer pattern grips better and stays open |
| Wavy | Classic three-strand, high or low | Natural texture helps loops hold their shape |
| Curly | Boho leave-out or low romantic | Curl gives free volume inside the wings |
| Coily / natural | Feed-in protective version | Tucks ends away and can last over a week |
| Fine or thin | Idea 15, pull-through start | Creates width the hair does not naturally have |
| Thick or heavy | Idea 16, stacked elastics | Base support stops the style sliding down |
| Occasion | Best ideas | Finish |
| Everyday / school run | 1, 8, 14 | Soft hold, no accessories |
| Wedding or formal | 5, 11, 12 | Curls, pins, flexible spray |
| Festival / party | 6, 9, 13 | Colour, ribbon, stronger set |
| Protective styling week | 2, 7 (feed-in) | Silk scarf at night, moisture daily |
How long a butterfly braid ponytail lasts, and how to maintain it?
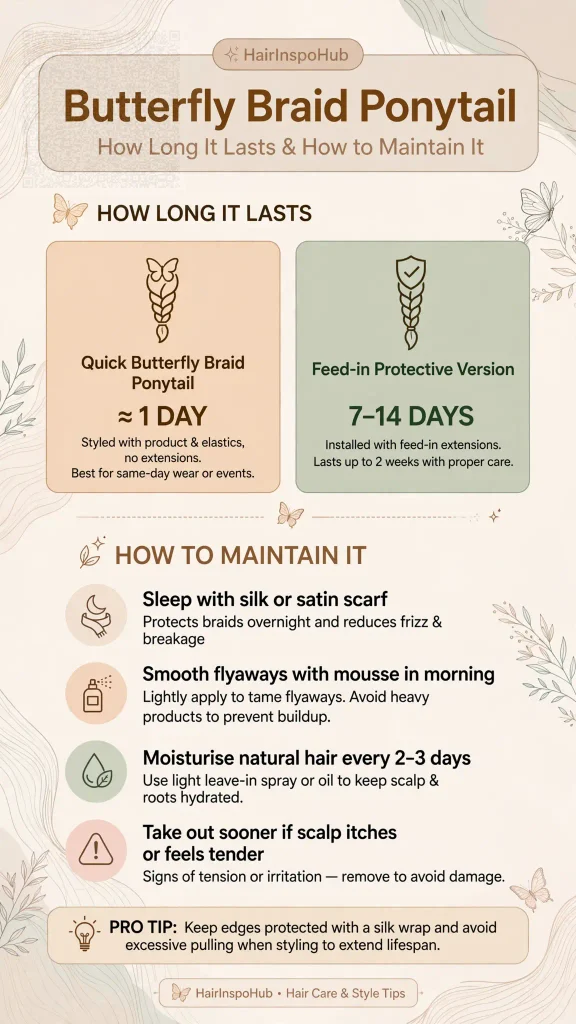
The quick version is a one-day style: expect it to look its best for 6 to 10 hours, with a 30-second loop re-fluff before evening. The feed-in protective version is different. Worn with basic care, it commonly lasts 7 to 14 days, and the maintenance is simple:
- Every night: tie the style down with a silk or satin scarf, or sleep on a satin pillowcase. Cotton pulls moisture out and frizzes the loops open in the wrong way.
- Every morning: smooth flyaways with a small amount of mousse or setting foam on your palms, pressed down, never brushed through the loops.
- Every 2 to 3 days (protective version): lightly moisturise your own hair underneath with a water-based leave-in spray, focusing on the parts the scarf does not cover.
- Wash day limit: if the scalp itches, feels tender or the style starts to smell, the style comes out, whatever day it is. A protective style that stays in past scalp comfort is no longer protecting anything.
5 mistakes that quietly ruin a butterfly braid ponytail
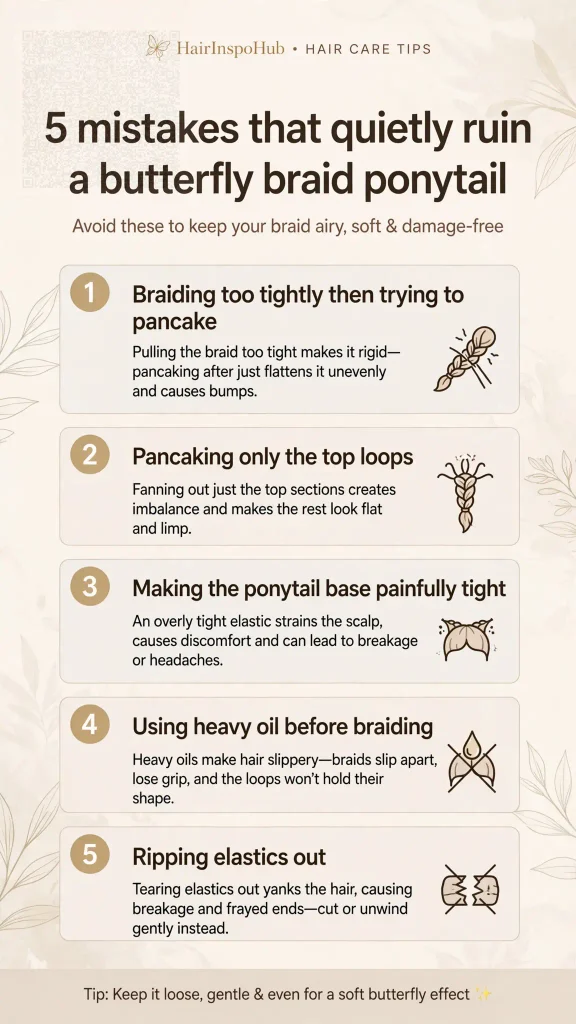
- Braiding too tightly, then trying to pancake. A tight braid has nothing left to give. Braid loosely from the start; the width comes from opening, not from the braid itself.
- Pancaking only the top loops. Big wings at the top and a skinny rope underneath is the most common beginner result. Work down both sides evenly, a little at a time.
- Making the ponytail base painfully tight for “security”. A secure base comes from a good elastic and correct placement, not from pain. Ongoing pulling at the hairline can stress the edges, especially in a style worn for days.
- Using heavy oil before braiding. Loops slide closed within the hour. Save oils for the take-down and for moisturising underneath a protective version.
- Ripping elastics out at the end of the day. Cut small clear elastics with tiny scissors or slide them out. Dragging them down a pancaked braid snaps the very ends you were protecting.
How to take the style down safely
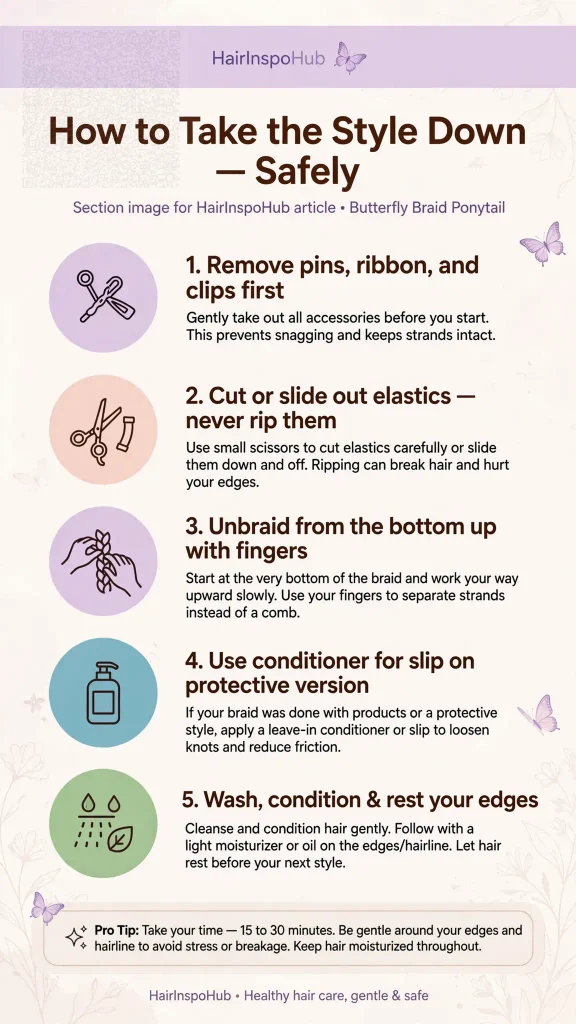
- Remove any pins, ribbon or clips first, checking the back with the small mirror.
- Cut or slide out the end elastic, then unbraid from the bottom upward with your fingers, never a brush.
- For the protective version, work in sections: loosen the braid, add a little slip from a conditioner or detangler, and remove shed hair gently with your fingers before washing.
- Wash and condition as normal, and give tight-base styles a rest day before repeating them. Hairlines like rest days as much as people do.

Stella Mary is a US-based hair care enthusiast and lifestyle writer at HairInspoHub, sharing trend-forward hairstyle tutorials, styling tips, and healthy hair rituals for women of every hair type. Specializing in Pinterest-inspired looks from bridal updos and effortless braids to heatless waves and sleek ponytails. She blends timeless elegance with everyday practicality. Her mission making gorgeous, confidence-boosting hairstyles accessible to everyone, one tutorial at a time.